
Red hat on a mysterious woman (generated by Midjourney). Credit: libre-software.net. License: CC BY-SA 4.0
How to use sudo on RHEL, CentOS, AlmaLinux, Rocky Linux or Oracle Linux
Last updated on October 6, 2022
This short howto is about setting up sudo on Red Hat Entreprise Linux (RHEL) and its derivates – for example CentOS, AlmaLinux, Rocky Linux or Oracle Linux. It also gives a quick introduction on using the vi text editor through visudo.
Becoming root: su & sudo
CentOS, Scientific Linux and RHEL do not use sudo as Ubuntu does. Instead, you are supposed to use su or su root to get higher permissions. su stands for super user or switch user. Type exit to exit the superuser mode. More information on su on the CentOS Wiki.
After years using Ubuntu and Linux Mint, I got used to sudo. To be able to run sudo on CentOS, one has to add the current user to the /etc/sudoers file. Editing the sudoers file is done via the visudo utility.
Editing sudoers with visudo
Visudo edits the sudoers file in a safe fashion, locks the sudoers file against multiple simultaneous edits, provides basic sanity checks, and checks for parse errors. (from the visudo man page)
You can only run visudo as root, so that we’ll need to run su:su root
The next step is to run visudo without any parameters. It will open the /etc/sudoers file in vi (a text editor):visudo
Using the vi text editor
There is no need to be familiar with vi, just to know the some basics. Vi has two so called “modes”:
– The insert mode allows you to insert/write text
– The command mode is for saving files, text manipulation and much more.
To edit a file, type i to enter the insert mode.
Press Esc to exit the insert mode and enter the command mode.
In command mode, use a : colon to start commands:
Press : + w + q + Enter to save your changes and exit (write and quit)
Type : + q + ! + Enter to exit without saving changes.
Add yourself to the sudoers in visudo
All you have to do now is to add the following line at the end of the file (press i to enter insert mode):user_name ALL=(ALL) ALL
ALL must be written in capital letters. Replace user_name with your user name.

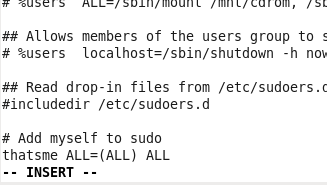
Finally, press Esc to enter the command mode, and : + w + q + Enter to save and exit the editor. Changes are effective immediately, you may now use sudo.
N.B. If you plan to use Truecrypt, comment out the following line in /etc/sudoers by inserting a dash:#Default requiretty
By Johannes Eva, 2012 – October 2022
15 thoughts on “How to install LibreOffice on Linux Mint, Ubuntu, MX Linux, Debian…”
You may use the official appimage in Libre Office as well. In fact, on Linux Mint 21 you can’t get rid of the default LO as it may lead to dependency issues. Appimage helps.
Pingback: Ubuntu 21.04: Essentials – Linux Sagas
Right! The correct command for removing completely the stock LibreOffice on Linux is the following:
sudo apt purge libreoffice-commonThe following command also works but misses some packages:
sudo apt purge libreoffice*Thank you for your comment, I updated the article accordingly.
Issuing
$ sudo apt-get remove libreoffice-coreinstalls an office core no gui. With or without purging. Yielding this:The following packages will be REMOVED:libreoffice-base libreoffice-calc libreoffice-core libreoffice-draw libreoffice-gnome libreoffice-gtk3 libreoffice-impress libreoffice-lightproof-ru-ru libreoffice-math libreoffice-nlpsolver libreoffice-report-builder libreoffice-report-builder-bin libreoffice-script-provider-python libreoffice-sdbc-postgresql libreoffice-wiki-publisher python3-uno
The following NEW packages will be installed:
libreoffice-core-nogui
Many thanks for any clarification!
NOTE:- I found that Libre Office version 6.3.2.2 is extremely buggy, it has major dependency problems attempting to install on Linux Mint (Tina 19.2). I wasn’t able to resolve these problems so had to revert the install (remove 6.3.2.2-2) and return to previous version 6.3.1 which works fine.
**Windows 10 (1903) ALSO NOTE that LO 6.3.2.2 installs on W10 but also caused major performance issues and hung my system on reboot. My machine Borked badly so once again had to revert back to LO 6.3.1 which works fine.
Thanks for the Terminal codes. Newbies like me just want it to work and your codes provide the copy and paste necessities for Linux to do its magic.
(If it can’t be done in Linux (and LibreOffice) its not worth doing)
The last line says it all: check if you are running another instance of dpkg. In last resort, try to remove dpkg lock file:
sudo rm /var/lib/dpkg/lockThen let dpkg fix itself:
sudo dpkg --configure -aNote that this problem is not per se related to LibreOffice.
please help me with this error, newbee here
root@Anon:~/libreoffice# sudo dpkg -i *.debdpkg: error: dpkg status database is locked by another process
root@Anon:~/libreoffice# cd LibreOffice_6.0.2.1_Linux_x86_deb
root@Anon:~/libreoffice/LibreOffice_6.0.2.1_Linux_x86_deb# sudo dpkg -i *.deb
dpkg: error: dpkg status database is locked by another process
root@Anon:~/libreoffice/LibreOffice_6.0.2.1_Linux_x86_deb# cd debs
bash: cd: debs: No such file or directory
root@Anon:~/libreoffice/LibreOffice_6.0.2.1_Linux_x86_deb# cd DEBS
root@Anon:~/libreoffice/LibreOffice_6.0.2.1_Linux_x86_deb/DEBS# sudo dpkg -i *.deb
dpkg: error: dpkg status database is locked by another process
root@Anon:~/libreoffice/LibreOffice_6.0.2.1_Linux_x86_deb/DEBS# sudo dpkg -i *.deb
dpkg: error: dpkg status database is locked by another process
Thank you Stefano, that was the info I was looking for. This method works even for LibreOffice 6.
Please mind that the mentioned PPA is only available on LTS and the latest non-LTS release.
In Ubuntu, you could use this repository and LibreOffice will always be upgraded to the latest version:
sudo add-apt-repository ppa:libreoffice/ppa
Details here:
http://tipsonubuntu.com/2017/01/31/install-libreoffice-5-3-ubuntu/
Would be useful to know how to install such alongside the native repository install of LibreOffice – without conflict. Would be useful to be able to choose, say, LibreOffice Writer 5.2, vs just LibreOffice Writer. Migrations / new versions not always working as seamlessly as one might like with files one might already have. It can be very frustrating to have a new version munge (e.g. formatting) of a current document one depends on, and not being able to ‘un-munge’ it.
Thanks Ogalho. Alacarte is a great tool, though it has not been updated for a while. An alternative is MenuLibre, which is also not very often updated. Anyway, here is a tutorial for Alacarte:
https://www.howtoforge.com/tutorial/how-to-manage-main-menu-icons-in-gnome/
Alacarte for Linux Mate Edition is named Mozo.
All of them should be good enough to create menu shortcuts for LibreOffice!
Install alacarte to manage the menu itens.
Works well. The only problem I had is that the icons were not created. I created them manually by running Writer, Calc and Impress and the using the “Lock to Launcher” option. This is how to run them from the terminal:
Writer: /opt/libreoffice5.0/program/oosplash –writer
Calc: /opt/libreoffice5.0/program/oosplash –calc
Impress: /opt/libreoffice5.0/program/oosplash –impress
Comments are closed.