
Photo: libre-software.net. License: CC BY-SA 4.0
How to install a LEMP stack on Ubuntu Server 18.04, 20.04 or 22.04
Last updated on October 19, 2022
Introduction
This guide shows how to get a full LEMP software stack installed on Ubuntu Server 18.04 “Bionic Beaver”, 20.04 “Focal Fossa” or 22.04 “Jammy Jellyfish”. The LEMP stack can later be used to set up a CMS like WordPress, Joomla or Drupal.
Requirements
- A remote server (VPS or dedicated). Any DigitalOcean Droplet or Linode cloud server is adapted. Even the smallest Vultr cloud server is capable of serving a high amount of requests (with proper Nginx FastCGI caching). These instructions are not compatible with shared hosting.
- A fresh Ubuntu installation. This guide does not cover the Linux installation itself.
Copy and paste instructions the Linux way: use the middle-click to paste
Before you copy and paste a lot of commands, make sure you do it the most efficient way. I have seen a lot of advanced Linux users being really inefficient doing basic copy and paste. The Linux way to copy and paste is the following:
- Select any text in any application.
- Use the mouse middle-click to paste – for example in a terminal.
Please note that selecting a text already does the copy. There is no need to actively copy via a menu or via Ctrl + C. This way of copy and pasting is by far the fastest. More, the paste buffer won’t interfere with the “normal” (menu or keyboard activated) copy and paste buffer. As a consequence, you can use two parallel copy and paste buffers on Linux.
Want to be even more efficient? The following Ubuntu documentation page gives even more uses of the middle-click:
Ubuntu Official Documentation » Middle-click
1. Prepare Ubuntu
1.1 Connect to server via SSH
On Windows, download the free Putty software. Though the official website looks like a relict of the 20th century, the software is a reference. On Linux, simply use a terminal:ssh root@your.server.ip.address
Alternatively, use ssh keys instead of password:
SSH login without password using SSH keys
1.2 Check your Ubuntu version
In this tutorial, we’ll use Ubuntu 18.04 / 20.04 / 22.04. However, this guide should work with any Ubuntu version. You can check your Linux version with the following command:
lsb_release -a
Ubuntu 22.04

Ubuntu 20.04

Ubuntu 18.04

1.2 Change root password, create new user with sudo privileges
Change the root password:passwd
This command changes the password for the current user, which is fine now as you are probably logged in as root.
Create a new user:adduser newuser
Add sudo privileges to the newly created user (as a secondary group):usermod -aG sudo newuser
Verify that the change was made:id newuser
The id
command should output something like this:uid=1001(newuser) gid=1001(newuser) groups=1001(newuser),27(sudo)
If you want to know more about adding new and existing users to primary and secondary groups in Linux, check out this reference article:
Linux: Add User to Group (Primary/Secondary/New/Existing)
1.3 Update packages
Since Ubuntu 16.04, no need to use apt-get
anymore, apt
is enough.
Update the list of available updates:sudo apt update
Upgrade the current packages:sudo apt upgrade
Or combine both in one line:sudo apt update && sudo apt upgrade
Frequent problem with locales (perl warning)
You may run into the following warning when installing or upgrading packages:
perl: warning: Setting locale failed.
[...]
perl: warning: Falling back to a fallback locale ("en_US.UTF-8").
locale: Cannot set LC_ALL to default locale: No such file or directory
Check the following post for a solution:
Ubuntu: resolve the “perl: warning: Setting locale failed” problem
1.4 Set up automatic updates
If you don’t have time to update your server manually on a regular basis, it is recommended to set up automatic updates.
Follow this tutorial to enable automatic updates on Ubuntu:
2. Install Nginx on Ubuntu

There are at least three common ways to install Nginx on Ubuntu:
- Install the default Nginx packages from the Ubuntu repositories (recommended).
- Install Nginx from the Nginx “Mainline” ppa.
- Install Nginx from the official nginx.org repository.
The Nginx version from nginx.org (3.) seems to be more up-to-date than the Nginx Mainline ppa (2.), which is mostly more recent than the “stock” Nginx version which comes with Ubuntu 18.04 / 20.04 / 22.04 (1.).
2.1 Install the default Nginx packages from the Ubuntu repositories (recommended)
Current Nginx version in Ubuntu 18.04: Nginx 1.14.0 (released in April 2018).
Current Nginx version in Ubuntu 20.04: Nginx 1.18.0 (released in April 2020).
Current Nginx version in Ubuntu 22.04: Nginx 1.18.0 (released in April 2020)!
This installation procedure is the easiest and most common. Use this one if you are unsure. Installing Nginx from the Ubuntu repositories has one drawback: the packages tend to get old quickly.
sudo apt update
sudo apt install nginx
Or combine both in one line:sudo apt update && sudo apt install nginx
If you chose this installation method, skip points 2.2 and 2.3 and jump to 2.4 to test Nginx.
2.2 Install Nginx from the Nginx “Stable” ppa
NGINX “Stable” ppa on Launchpad:
https://launchpad.net/~nginx/+archive/ubuntu/stable
Current “Mainline” ppa version: Nginx 1.18.0 (released April 2020).
The typical use case for this ppa is when the default repository version in Ubuntu 18.04 / 20.04 is not actual anymore.
Add the repository with the following command:sudo add-apt-repository ppa:nginx/stable
NB: Since Ubuntu 18.04, running apt-get update
after adding a repository is no longer needed: it will run automatically after add-apt-repository
.
Now install Nginx:sudo apt install nginx
Warning: The “Mainline” ppa on Launchpad doesn’t seem to be regularly supported anymore. As of September 2022, it stalled to Nginx 1.17.3 and does not currently support Ubuntu 20.04 or 22.04.
https://launchpad.net/~nginx/+archive/ubuntu/mainline
Jump to point 2.4 to test Nginx.
2.3 Install Nginx from the official nginx.org repository
Pre-Built Packages for Mainline version on nginx.org:
http://nginx.org/en/linux_packages.html#mainline
This will get you the latest version of Nginx. Use this version if you are a pro and if you really need the most actual Nginx build, as it may lack some Ubuntu specific integration and tweaks.
Download and add the PGP key to authenticate the Nginx repository signature:wget -qO - https://nginx.org/keys/nginx_signing.key | sudo apt-key add -
Append the repositories to the end of the /etc/apt/sources.list file:
echo "deb http://nginx.org/packages/mainline/ubuntu/ bionic nginx" | sudo tee -a /etc/apt/sources.list
echo "deb-src http://nginx.org/packages/mainline/ubuntu/ bionic nginx" | sudo tee -a /etc/apt/sources.list
Update and install:sudo apt update && sudo apt install nginx
2.4 Test Nginx
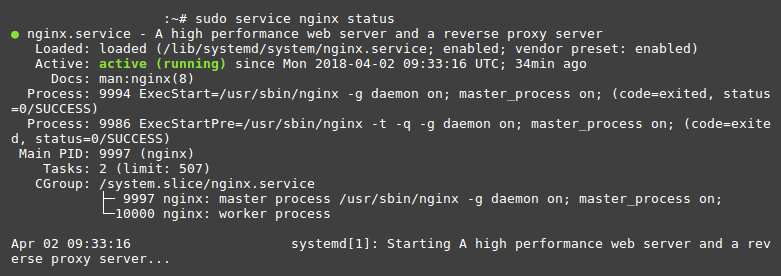
Check the Nginx system service status and version with the following command:sudo service nginx status
Stop and start Nginx:sudo service nginx stop
sudo service nginx start
Or simply restart:sudo service nginx restart

Should you use systemctl
or service
to manage system services?
Are you wondering what the difference between systemctl
and service
could be, and which one you should be using?
- Short answer: for basic tasks, use
service
. For advenced system management, prefersystemctl
(orinitctl
or the/etc/init.d
script on other distributions). - Long answer: read the first answer on Ask Ubuntu:
Difference between Systemctl and Service
Nginx version and http test
Enter this command if you want to know which version of Nginx you are running:nginx -v
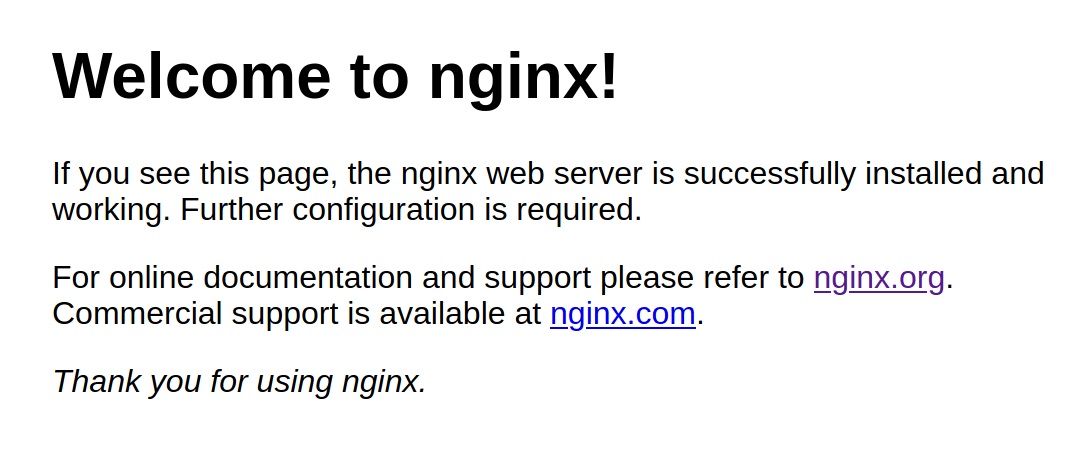
Test Nginx in your browser:http://your.server.IP.address
This should display the standard Nginx welcome page in your browser:

3. Install ufw firewall

Install ufw:sudo apt install ufw
Make sure the firewall will let through SSH connections (important!) and Apache traffic. Ufw has presets for both. Display the presets for these applications:sudo ufw app list
To get more information on a profile, use:sudo ufw app info "Nginx Full"
Allow OpenSSH and Apache connections:sudo ufw allow OpenSSH
sudo ufw allow in "Nginx Full"
or as in the Digital Ocean guide:
sudo ufw allow 'Nginx HTTP'
sudo ufw allow 'Nginx HTTPS'
If you install Nginx from the nginx.org servers, there will be no preinstalled ufw rules for nginx. Then simply use:
sudo ufw allow http
sudo ufw allow https
Now that SSH is allowed, enable the Firewall (confirm with “y”):sudo ufw enable
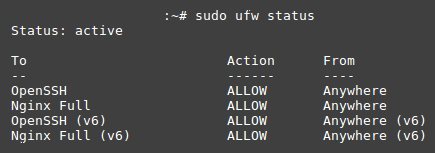
Check the firewall status:sudo ufw status

4. Install MariaDB/MySQL

MariaDB vs MySQL
Should you choose MySQL or MariaDB for your LEMP server? I couldn’t find any reliable benchmarks comparing the performance of MySQL vs MariaDB as part of a LEMP stack. Chances are high that the performance is comparable. In this tutorial, we’ll cover both MySQL and MariaDB – it’s up to you to choose.
4.1 Install MariaDB
MariaDB is a fork of MySQL, leaded by some of the original developers of MySQL. MariaDB can be used as a high compatible drop-in replacement of MySQL.
MariaDB is used by Wikimedia and the Mozilla foundation – amongst others. Some of the biggest Linux distribution have switched to MariaDB, such as Debian, Red Hat Enterprise Linux, openSUSE/SLES, … On all my new websites (which includes my new website on tablets and e-readers for musicians), I install MariaDB instead of MySQL.
Install MariaDB with the following command:sudo apt install mariadb-server
4.2 Install MySQL
We’ll use the default MySQL packages from the Ubuntu repositories.
Install MySQL with the following command:sudo apt install mysql-server
The installation may ask you to set a “root” password – don’t use the same as your servers root password!
4.3 Configure MariaDB/MySQL
Continue with the following command, which is valid both for MariaDB and MySQL:sudo mysql_secure_installation
If you use MariaDB, a root password does not exist and you will be prompted to create a new one (just press enter at the first question and set a new password). If you use MySQL, you probably already created a root password during the mysql-server
package installation.
Here are the recommended answers to the next questions:
- Remove anonymous users? [Y/n]: Y
- Disallow root login remotely? [Y/n]: Y
- Remove test database and access to it? [Y/n]: Y
- Reload privilege tables now? [Y/n]: Y
Restart MariaDB/MySQL (this command works for both):sudo service mysql restart
sudo service mariadb restart
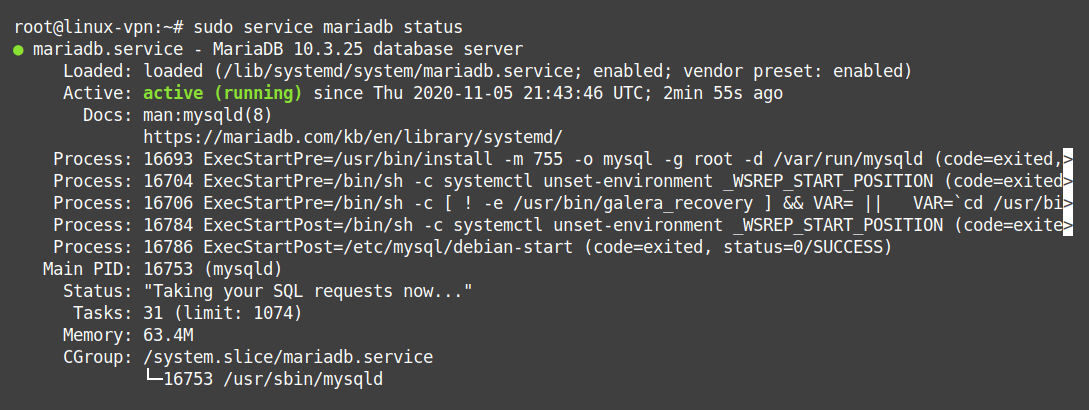
Check whether MariaDB/MySQL server is running with the following command:sudo service mysql status
sudo service mariadb status
Note that the commands for MySQL also work for MariaDB.

Stop and start the MariaDB/MySQL server with:sudo service mysql stop
sudo service mysql start
sudo service mariadb stop
sudo service mariadb start
5. Install PHP
The default PHP version which comes with Ubuntu 18.04 is PHP 7.2 (deprecated since November 2020). Ubuntu 20.04 installs PHP 7.4 by default.
More information on PHP support: official “Supported Versions” page.
5.1 Install PHP 7.4
sudo apt install php-fpm php-mysql
If you plan to install WordPress on this server, install the following php modules:sudo apt install php-curl php-zip mcrypt php-gd php-mbstring php-xmlrpc php-xml php-intl php-soap php-imagick
Restart php-fpm for php modules to be activated:sudo service php7.4-fpm restart
Check if it works:sudo service php7.4-fpm status
Check the DigitalOcean article to configure the php processor and Nginx.
5.2 Install PHP 7.x / PHP 8.x
To install another PHP version, add Ondřej Surý’s ppa. This PPA is well known, up to date, and is considered as safe to use.
To be able to use add-apt-repository
, install the following package:sudo apt install software-properties-common
Then add the ppa:sudo add-apt-repository ppa:ondrej/php
sudo apt update
Now install php (replace numbers with chosen version):sudo apt install php7.4-fpm php7.4-mysql
sudo apt install php8.0-fpm php8.0-mysql
sudo apt install php8.1-fpm php8.1-mysql
Make the downgraded version of PHP the default version:sudo update-alternatives --set php /usr/bin/php7.4
sudo update-alternatives --set php /usr/bin/php8.0
sudo update-alternatives --set php /usr/bin/php8.1
For later WordPress installation, install the following php modules:sudo apt install php7.4-curl php7.4-gd php7.4-mbstring php7.4-xmlrpc php7.4-xml php7.4-zip mcrypt php7.4-gettext php7.4-soap php7.4-imagick
php7.4-intl
sudo apt install php8.0-curl php8.0-gd php8.0-mbstring php8.0-xmlrpc php8.0-xml php8.0-zip mcrypt php8.0-gettext php8.0-soap php8.0-imagick php8.0-opcache php8.0-phpdbg php8.0-cli
php8.0-intl
sudo apt install php8.1-curl php8.1-gd php8.1-mbstring php8.1-xmlrpc php8.1-xml php8.1-zip mcrypt php8.1-gettext php8.1-soap php8.1-imagick php8.1-opcache php8.1-phpdbg php8.1-cli php8.1-intl
Restart php-fpm for php modules to be activated:sudo service php7.4-fpm restart
sudo service php8.0-fpm restart
sudo service php8.1-fpm restart
Check if it works:sudo service php7.4-fpm status
sudo service php8.0-fpm status
sudo service php8.1-fpm status
6. Configure Nginx to use PHP
At this point, Nginx doesn’t know it should use php-fpm to process .php files.
Open the default Nginx server block configuration file:sudo nano /etc/nginx/sites-available/default
Add index.php to the list:index index.php index.html index.htm index.nginx-debian.html;
Uncomment the following four lines by removing the #
at the beginning of each line:
location ~ \.php$ {
include snippets/fastcgi-php.conf;
fastcgi_pass unix:/var/run/php/php
7.4-fpm.sock;
}
↑ Important: change the penultimate line to match your php version!
And finally, uncomment these three lines:location ~ /\.ht {
deny all;
}
The server block configuration file should now look like this (except a few comments I removed for clarity):

If you use nano, save with Ctrl + O , then ⏎ Enter . Type Ctrl + X to exit.
Test the configuration:nginx -t
7. Allow big files upload in Nginx and PHP
Increase upload limit in Nginx
The standard upload size limit in Nginx is 1 MB. This limit is probably too low for most use cases including any CMS. Too large files will generate a 413 (Request Entity Too Large) error.
The maximum upload size is defined by the client_max_body_size
directive. Edit the Nginx configuration file:sudo nano /etc/nginx/nginx.conf
Type Ctrl + W to search for the client_max_body_size
variable. On a fresh installation it probably isn’t defined at all. Modify or add the following line inside the http
block:client_max_body_size 20M;

Adapt to your needs, for example 10M, 100M, 500M or 2G. Set the size to 0 to disable any checking of the upload size (not recommended!). Use m
or M
for Megabites, G
or g
for Gigabytes. More details on Nginx’ configuration file measurement units:
Nginx.org: Configuration file measurement units
Note that the client_max_body_size
variable can also be set in the server
and location
contexts.
In nano, save with Ctrl + O , then ⏎ Enter . Type Ctrl + X to exit.
Test the configuration:nginx -t
Reload Nginx:sudo service nginx reload
Increase file upload limit in PHP
Also modify the php.ini file to allow for bigger uploads:
sudo nano /etc/php/7.4/fpm/php.ini
sudo nano /etc/php/8.0/fpm/php.ini
sudo nano /etc/php/8.1/fpm/php.ini
Type Ctrl + W to search for upload_max_filesize
(default: 2M) and post_max_size
(default: 8M).
upload_max_filesize = 20M
To upload large files, post_max_size
must be larger than upload_max_filesize
. For ore information, see the official php.ini documentation.
post_max_size = 22M
Restart PHP (adapt to your PHP version):sudo service php7.3-fpm restart
sudo service php7.4-fpm restart
sudo service php8.0-fpm restart
sudo service php8.1-fpm restart
8. Install a Let’s Encrypt certificate
Enable your website configuration for Nginx
Set a symbolic link to the Nginx configuration of the new site:
sudo ln -s /etc/nginx/sites-available/your_domain /etc/nginx/sites-enabled/
Test configuration and restart nginx:
sudo nginx -t
sudo service nginx reload
Set a CAA DNS record
Before installing a let’s encrypt certificate, you may want to set a CAA DNS record to improve security (optional):
- Good documentation: What’s a CAA record?
- CAA Record Generator by SSLMate
- DNS CAA tester

Install Let’s Encrypt via Certbot
For Ubuntu versions up to 20.04, follow this reference article:
Digital Ocean: How To Secure Nginx with Let’s Encrypt on Ubuntu 20.04
For newer Ubuntu releases, Certbot recommends using their snap package. Follow the updated Digital Ocean guide:
Digital Ocean: How To Secure Nginx with Let’s Encrypt on Ubuntu 22.04
Of course, don’t forget to test your SSL & certificate security:
SSL Labs server test
Improve security
Especially on Ubuntu 18.04, check my article on how to remove TLSv1.0 / 1.1 and enable TLS 1.3:
9. Install WordPress
The excellent Digital Ocean guide on WordPress with LEMP is stalled to Ubuntu 20.04 – however it still works with Ubuntu 22.04:
How to Install WordPress with LEMP on Ubuntu 20.04
Alternatively, the WordPress with LAMP tutorial was updated to Ubuntu 22.04. It was written by a different authors, so the installation process has small differences:
How To Install WordPress on Ubuntu 22.04 with a LAMP Stack
Here are some more or less important improvements to these tutorials:
Database creation: use “better” UTF-8 charset and collation when creating the database
When creating the WordPress database, check the character set – the two mentioned guides use the old utf8
instead of the newer utf8mb4
. Also, prefer the utf8mb4_unicode_520_ci
collation.
Instead of using:
CREATE DATABASE
databasename
DEFAULT CHARACTER SET utf8 COLLATE utf8_unicode_ci;
prefer the following, which is based on a newer Unicode standard:
CREATE DATABASE
DEFAULT CHARACTER SET utf8mb4 COLLATE utf8mb4_unicode_520_ci;databasename
Use the right commands to create an SQL user
The updated Digital Ocean LAMP with Ubuntu 22.04 guide uses the following commands (two lines) to create user and database rights:
CREATE USER '
'@'%' IDENTIFIED WITH mysql_native_password BY 'databaseuser
';password
GRANT ALL ON
.* TO 'databasename
'@'%';databaseuser
Using WITH mysql_native_password BY
is basically the same as just using IDENTIFIED BY
:
CREATE USER '
'@'%' IDENTIFIED BY 'databaseuser
';password
GRANT ALL ON
.* TO 'databasename
'@'%';databaseuser
However, using the '%'
wildcard host instead of 'localhost'
may not be the best solution. Using “localhost” leads to a faster local socket connection whereas using '%'
uses TCP/IP. Both work, but using unix sockets is both more secure and more efficient. So here is what seems the best way to create a database for WordPress:
CREATE USER '
'@'localhost' IDENTIFIED BY 'databaseuser
';password
GRANT ALL ON
.* TO 'databasename
'@'localhost';databaseuser
Allowed MySQL/MariaDB passord characters
If in lack of inspiration, you can generate a password with Unix Sage Random Password Generator. Sources diverge on which special characters should be used as MySQL/MariaDB user passwords. Using asterisks (*) and periods (.) can cause problems – at least if you plan to use phpMyAdmin. Also, shell wildcard characters or other characters interpreted by the shell can cause problems. Maybe you shoud avoid " ' $ , [ ] * ? { } ~ # % \ < > | ^ ;
.
Compensate the lack of special characters by choosing a longer password.
Flush and check privileges:FLUSH PRIVILEGES;
SHOW GRANTS FOR '
'@'localhost';databaseuser
10. Connect to FTP via SSH
Create a new FTP user:adduser ftpuser
If you plan to install WordPress or another CMS, you may want to add this user to the www-data
group. To ensure files updoaded by ftpuser
will have the www-data group label by default, add www-data
as a primary group:sudo usermod -g www-data ftpuser
By Johannes Eva, January 2017 – October 2022
4 thoughts on “How to install a LEMP stack on Ubuntu Server 18.04, 20.04 or 22.04”
Hi Eva…
Thanks for this complete tutorial, it is really very helpful for the community. But, for those who don’t want to bother installing the LEMP stack one by one, you can use the auto installer tools.
For this, I usually use the LEMPer Stack, it might be useful for auto-installing the LEMP stack and at the same time managing a vps/cloud server for hosting PHP websites without the need for cpanel 🙂
LEMPer Stack
This tool is free and open source, you can contribute to its development via the Github repo => https://github.com/joglomedia/LEMPer
Looking forward to your feedback/review..
🙏🏻🤗
MySQL might takeover MariaDB in the near future for at least like WordPress servers, unless Maria gets a lot more money/team size.
See the SlickStack readme https://github.com/littlebizzy/slickstack
However interesting seems Ubuntu 20.04 is now supporting both of them.
On some blogs, I see
sudo service mysql start
for starting mariadb server whereas on other sites I see the command assudo systemctl start mariadb.service
.I want to know what’s the difference and which works correctly on Ubuntu 18.04?
Hi, this question is answered in this article, have a look here:
2.4 Test Nginx
Short answer: for basic tasks, use
service
.