
Metadata information can also be exported to an html document:
exiftool -h . > example.html
2. Add copyright information to image metadata on Linux
Copyright Notice and XMP Rights
After trying out a lot of metadata tags and testing the results, I recommend using both the -rights and -CopyrightNotice with identical content for copyright information.
More details: the -rights option seems to be a shorthand for -XMP-dc:Rights, and definitely a better solution than using the -copyright option, which doesn’t seem to produce readable results by gThumb and Gnome Image Viewer. The -CopyrightNotice option also works reliably and populates the ITPC CopyrightNotice field. The options -EXIF:Copyright and -copyright produce disappointing results in terms of compatibility with standard image managers on Linux.
Here is how to add standard copyright information to a file:
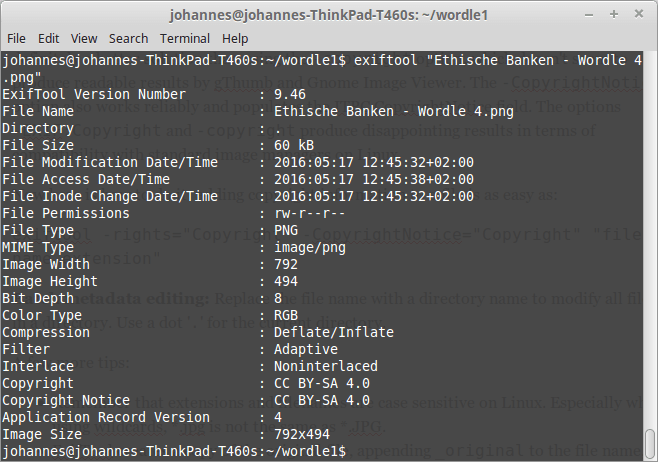
exiftool -rights="Copyright" -CopyrightNotice="Copyright" "file name.extension"
Batch metadata editing: Replace the file name with a directory name to modify all files in a directory. Use a dot ‘.‘ for the current directory.
A few more tips:
- Remember that extensions and filenames are case sensitive on Linux. Especially when using wildcards, *.jpg is not the same as *.JPG.
- ExifTool creates a copy of the original file, appending
_originalto the file name, as a backup. To avoid that and modify files directly, use the-overwrite_originaloption.
Here is a full example with a standard American copyright notice and no backup file:
exiftool -overwrite_original -rights="©2023 John Doe, all rights reserved" -CopyrightNotice="©2023 John Doe, all rights reserved" "file name.extension"

Add Creator / Author to image metadata
Here we want to add or change creator/author information of the XMP Dublin Core standard schema:
exiftool -XMP-dc:Creator="Creator" "file name.extension"

Copyright Notice an Creator metadata changes in one single command
exiftool -overwrite_original -rights="©2023 John Doe, all rights reserved" -CopyrightNotice="©2023 John Doe, all rights reserved" -XMP-dc:Creator="Creator" "file name.extension"
3. Edit Creative Commons rights information
The Creative Commons official recommendation concerning XMP metadata information is to use identical content for the dc:rights and xmpRights:UsageTerms fields.
exiftool -overwrite_original -XMP-dc:Rights="This work is licensed to the public under the Creative Commons Attribution-ShareAlike license http://creativecommons.org/licenses/by-sa/4.0/" -xmp:usageterms="This work is licensed to the public under the Creative Commons Attribution-ShareAlike license http://creativecommons.org/licenses/by-sa/4.0/" "file name.extension"
Also according to the Creative Commons recommendation, xmpRights:Marked soud be set to False if Public Domain, True otherwise. Here is an example to set the field to True:
exiftool -overwrite_original -xmp:usageterms=True "file name.extension"

Using the Creative Commons schema
Here are some examples for modifying the Creative Commons schema:
License URL
exiftool -overwrite_original -XMP-cc:license="http://creativecommons.org/licenses/by-sa/4.0/" "file name.extension"
Attribution name
exiftool -overwrite_original -XMP-cc:AttributionName="Creator" "file name.extension"
Attribution URL
exiftool -overwrite_original -XMP-cc:AttributionURL="Creator URL" "file name.extension"
Example combining License URL, attribution name and URL
exiftool -overwrite_original -XMP-cc:license="http://creativecommons.org/licenses/by-sa/4.0/" -XMP-cc:AttributionName="Creator" -XMP-cc:AttributionURL="http://creatorURL.com" "file name.extension"

Combining the CC right informations and Creative Commons schema
Here is an example for changing all metadata following the Creative commons recommendations:
exiftool -overwrite_original -XMP-dc:Rights="This work is licensed to the public under the Creative Commons Attribution-ShareAlike license http://creativecommons.org/licenses/by-sa/4.0/" -xmp:usageterms="This work is licensed to the public under the Creative Commons Attribution-ShareAlike license http://creativecommons.org/licenses/by-sa/4.0/" -XMP-cc:license="http://creativecommons.org/licenses/by-sa/4.0/" -XMP-cc:AttributionName="Creator" -XMP-cc:AttributionURL="http://creatorURL.com" "file name.extension"
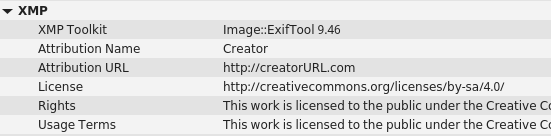
Final result:
Remove all metadata
Remove all metadata from a file:
exiftool -all= -overwrite_original "file name.extension"
Remove all metadata from the current directory:
exiftool -all= -overwrite_original .
Remove all metadata from all png files in the working directory:
exiftool -all= -overwrite_original -ext png .
By Johannes Eva, May 2016 – March 2023


2 thoughts on “How to edit EXIF metadata via the command line with ExifTool”
awesome work! I spent so much time looking for it.
I think you added a small typo when adding the xmpRights, it should be like this:
-XMP-xmpRights:Marked=True
Thanks again!
THANK YOU for this post. i have been wanting to post many CC BY-NC-ND 4.0 INTL images to archive.org and couldn’t find a simple-enough (yet *correct*) how-to. This post enabled me to assemble the full version (i made a bash script) that i needed. Perfect! Many thanks again for taking the time to set this up so clearly/simply and correctly. I even like your use of color and spacing to make finding things quicker for the eye to zoom in to. Well done, indeed.
Comments are closed.