
Photo: libre-software.net. License: CC BY-SA 4.0
How to edit image metadata on Linux using a graphical user interface
Last updated on October 11, 2022
Image metadata is a complex field with multiple standards, the most important among them being Exif, IPTC-IIM and XMP. In this guide I try to find a solution to edit (read, modify, remove) image metadata (jpg, png, …) on Linux, if possible with a graphical user interface (GUI).
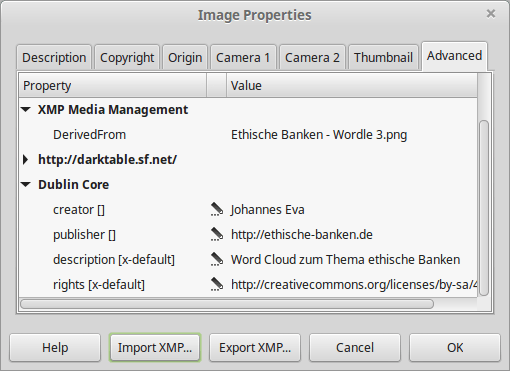
Many photo editors and image manipulation programs on Linux are capable to read and display Exif and XMP information. The GIMP can import and export .xmp files, but is unable to edit image metadata on-the-fly. Here is a screenshot of the GIMP’s “Image Properties” dialog:
Same thing for Eye of Gnome (aka Image Viewer), gThumb and most photo managers on Ubuntu, Linux Mint, Fedora, and most Linux distributions: they all can read at least Exif, but can’t edit image metadata.
Edit image metadata in Linux (GUI)
Currently there are only three pieces of software who are capable of editing pictures metadata. One of them is not Free Software: XnView is an image organizer which has been around for decades and comes as a Freeware for non-commercial use.
Modify image metadata with XnView
Download and install XnView MP from the official website. Open and select (with Control or ⇧ Shift) one or multiple files in XnView’s file browser, right-click on them and select “Edit ITPC/XMP”. You’ll get the following dialog, which also allows you to batch edit metadata information.
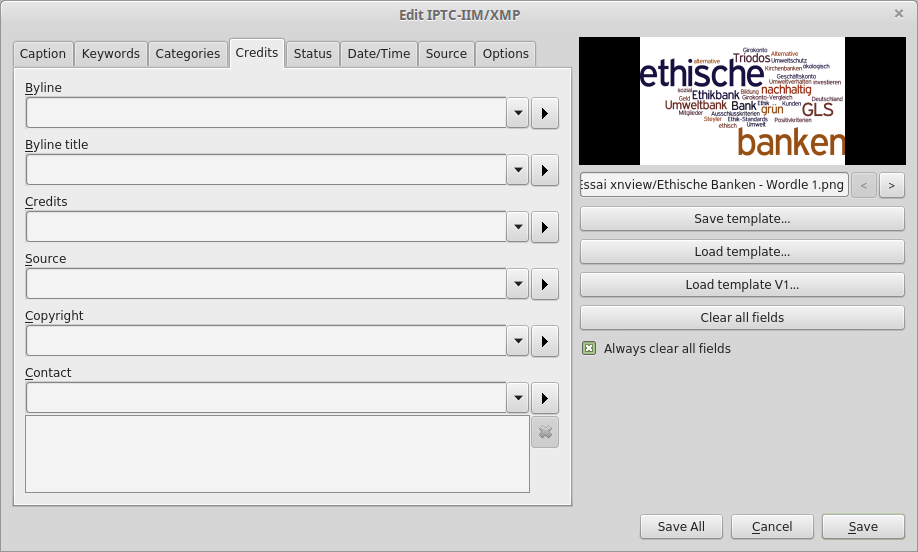
Saving metadata with XnView works fine, but I couldn’t figure out what kind of metadata I was editing. Was it Exif, XMP, or ITPC/IIM? The only solution was to edit and save changes, and later check the metadata information in an image viewer.
Also, adding Creative Commons license link in the Copyright field would create a dc:rights field, which is ok. The Credits and Source fields of the XnView metadata editor create photoshop:Credits and photoshop:Source metadata entries. I found no way to create dc:creator or dc:publisher XMP ITPC entries.
Modify image metadata with Darktable
Darktable is not a metadata editor, but an open source photography application and RAW developer. Install Darktable and import a bunch of files (lighttable/import module on the left side). Select one or multiple files and check out the “metadata editor” in the right sidebar: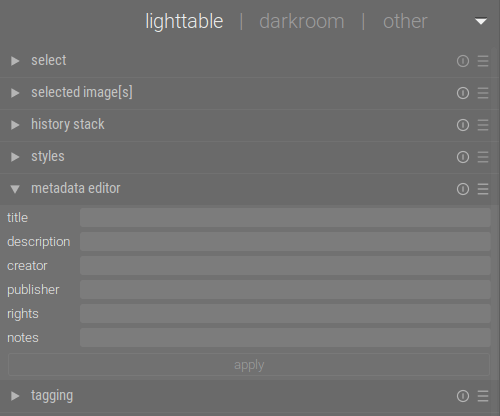
Unfortunately, Darktable is only able to edit a very limited set of metadata: title, description, creator, publisher, and rights. Batch edition is possible, though. Don’t forget to export through the “export selected” module. I had some trouble conserving the color space and ended up with considerably bigger image files (working with .png pictures) than the original after adding metadata.
Editing image metadata with Digikam
DigiKam is probably the most advanced photo editing software on Linux. It is written in QT for the KDE desktop environment, which is installed by default on Linux distributions as OpenSUSE, Kunbuntu and Mageia.
If you use Ubuntu, Linux Mint, Fedora, Debian with their default desktop environment (Unity, Cinnamon/Mate, Gnome), then installing DigiKam is not especially recommended, as it would come with huge dependencies.
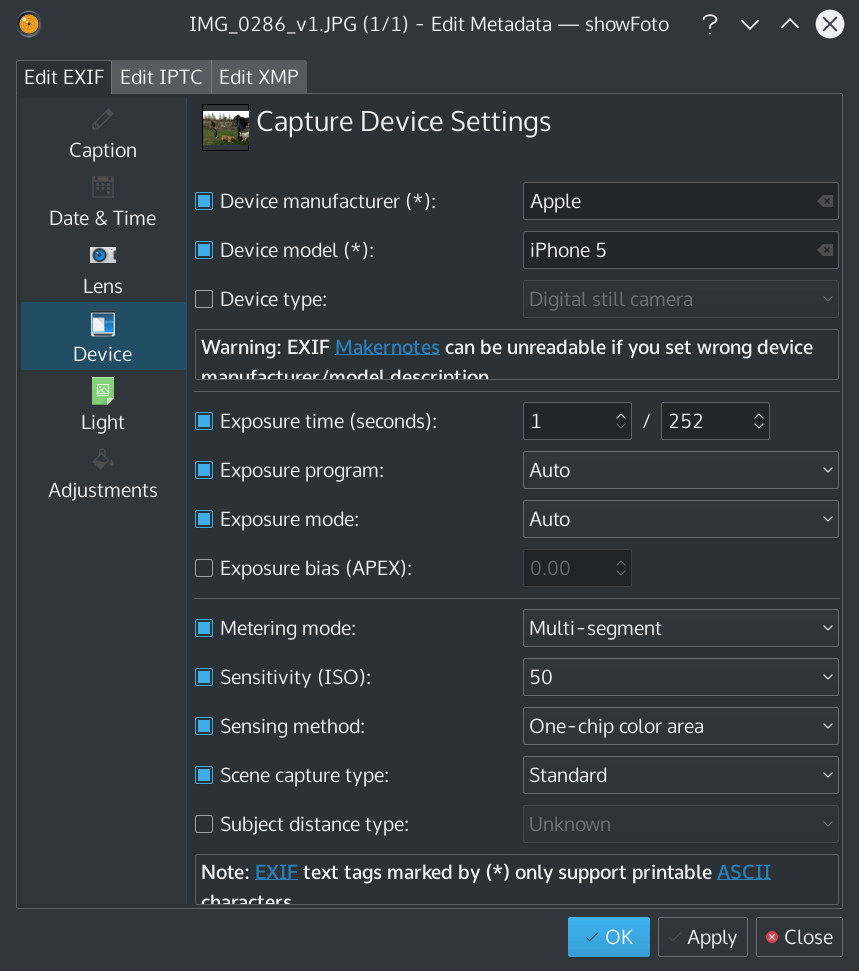
DigiKam’s Metadata Editor supports more than a few basic tags: a well-designed dialog makes editing EXIF, IPTC and XMP tags clear and understandable.
Conclusion on editing metadata on Linux via a GUI
If you happen to use KDE as your desktop environment, DigiKam is the best tool to edit image metadata. If you use Ubuntu, Linux Mint or any other distribution with another desktop environment, give XnView a try. Apart of its perfectible metadata editing capabilities, it happens to be a fantastic image manager and viewer.
In both cases, using command line tools may save you some time a the end. There are two GPL-Licensed powerful command line tools on Linux: Exiv2 and ExifTool. I ended up using ExifTool for my needs.
By Johannes Eva, April – October 2022


15 thoughts on “How to install LibreOffice on Linux Mint, Ubuntu, MX Linux, Debian…”
You may use the official appimage in Libre Office as well. In fact, on Linux Mint 21 you can’t get rid of the default LO as it may lead to dependency issues. Appimage helps.
Pingback: Ubuntu 21.04: Essentials – Linux Sagas
Right! The correct command for removing completely the stock LibreOffice on Linux is the following:
sudo apt purge libreoffice-commonThe following command also works but misses some packages:
sudo apt purge libreoffice*Thank you for your comment, I updated the article accordingly.
Issuing
$ sudo apt-get remove libreoffice-coreinstalls an office core no gui. With or without purging. Yielding this:The following packages will be REMOVED:libreoffice-base libreoffice-calc libreoffice-core libreoffice-draw libreoffice-gnome libreoffice-gtk3 libreoffice-impress libreoffice-lightproof-ru-ru libreoffice-math libreoffice-nlpsolver libreoffice-report-builder libreoffice-report-builder-bin libreoffice-script-provider-python libreoffice-sdbc-postgresql libreoffice-wiki-publisher python3-uno
The following NEW packages will be installed:
libreoffice-core-nogui
Many thanks for any clarification!
NOTE:- I found that Libre Office version 6.3.2.2 is extremely buggy, it has major dependency problems attempting to install on Linux Mint (Tina 19.2). I wasn’t able to resolve these problems so had to revert the install (remove 6.3.2.2-2) and return to previous version 6.3.1 which works fine.
**Windows 10 (1903) ALSO NOTE that LO 6.3.2.2 installs on W10 but also caused major performance issues and hung my system on reboot. My machine Borked badly so once again had to revert back to LO 6.3.1 which works fine.
Thanks for the Terminal codes. Newbies like me just want it to work and your codes provide the copy and paste necessities for Linux to do its magic.
(If it can’t be done in Linux (and LibreOffice) its not worth doing)
The last line says it all: check if you are running another instance of dpkg. In last resort, try to remove dpkg lock file:
sudo rm /var/lib/dpkg/lockThen let dpkg fix itself:
sudo dpkg --configure -aNote that this problem is not per se related to LibreOffice.
please help me with this error, newbee here
root@Anon:~/libreoffice# sudo dpkg -i *.debdpkg: error: dpkg status database is locked by another process
root@Anon:~/libreoffice# cd LibreOffice_6.0.2.1_Linux_x86_deb
root@Anon:~/libreoffice/LibreOffice_6.0.2.1_Linux_x86_deb# sudo dpkg -i *.deb
dpkg: error: dpkg status database is locked by another process
root@Anon:~/libreoffice/LibreOffice_6.0.2.1_Linux_x86_deb# cd debs
bash: cd: debs: No such file or directory
root@Anon:~/libreoffice/LibreOffice_6.0.2.1_Linux_x86_deb# cd DEBS
root@Anon:~/libreoffice/LibreOffice_6.0.2.1_Linux_x86_deb/DEBS# sudo dpkg -i *.deb
dpkg: error: dpkg status database is locked by another process
root@Anon:~/libreoffice/LibreOffice_6.0.2.1_Linux_x86_deb/DEBS# sudo dpkg -i *.deb
dpkg: error: dpkg status database is locked by another process
Thank you Stefano, that was the info I was looking for. This method works even for LibreOffice 6.
Please mind that the mentioned PPA is only available on LTS and the latest non-LTS release.
In Ubuntu, you could use this repository and LibreOffice will always be upgraded to the latest version:
sudo add-apt-repository ppa:libreoffice/ppa
Details here:
http://tipsonubuntu.com/2017/01/31/install-libreoffice-5-3-ubuntu/
Would be useful to know how to install such alongside the native repository install of LibreOffice – without conflict. Would be useful to be able to choose, say, LibreOffice Writer 5.2, vs just LibreOffice Writer. Migrations / new versions not always working as seamlessly as one might like with files one might already have. It can be very frustrating to have a new version munge (e.g. formatting) of a current document one depends on, and not being able to ‘un-munge’ it.
Thanks Ogalho. Alacarte is a great tool, though it has not been updated for a while. An alternative is MenuLibre, which is also not very often updated. Anyway, here is a tutorial for Alacarte:
https://www.howtoforge.com/tutorial/how-to-manage-main-menu-icons-in-gnome/
Alacarte for Linux Mate Edition is named Mozo.
All of them should be good enough to create menu shortcuts for LibreOffice!
Install alacarte to manage the menu itens.
Works well. The only problem I had is that the icons were not created. I created them manually by running Writer, Calc and Impress and the using the “Lock to Launcher” option. This is how to run them from the terminal:
Writer: /opt/libreoffice5.0/program/oosplash –writer
Calc: /opt/libreoffice5.0/program/oosplash –calc
Impress: /opt/libreoffice5.0/program/oosplash –impress
Comments are closed.