How to edit EXIF metadata via the command line with ExifTool
Last updated on March 30, 2023
In a previous post, I tried to find a metadata editor with a graphical user interface on Linux. The best solution, DigiKam, is designed for KDE. The second best option, XnView, is perfectible and not free software.
As a Linux Mint (Cinnamon) user, I ended up thinking that it would be better to use a command line tool for my simple metadata editing needs. Of the two available command line tools, Exiv2 and ExifTool. I chose ExifTool, which can be installed through the Software Center / Synaptic / Package manager or via the command line:
sudo apt-get install libimage-exiftool-perl
1. Display metadata information
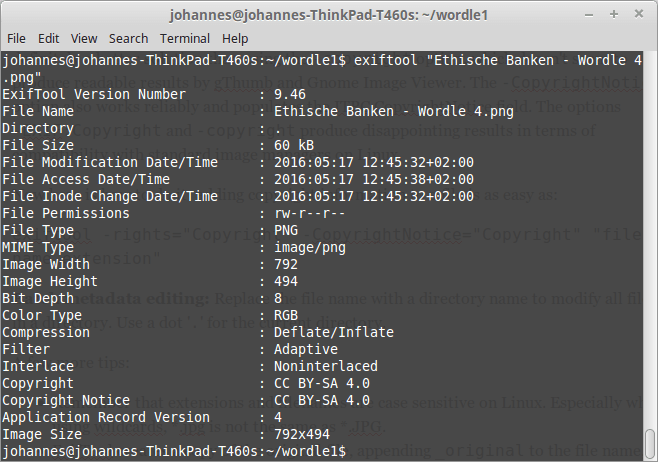
Nothing easier: ExifTool can display image metadata information of a single file:
exiftool "file name.extension"
To display metadata info of all files in a directory, use a dot ‘.‘ as in the following example (the output can be quite long):
exiftool .

ExifTool displaying image metadata
Metadata information can also be exported to an html document:
exiftool -h . > example.html
2. Add copyright information to image metadata on Linux
Copyright Notice and XMP Rights
After trying out a lot of metadata tags and testing the results, I recommend using both the -rights and -CopyrightNotice with identical content for copyright information.
More details: the -rights option seems to be a shorthand for -XMP-dc:Rights, and definitely a better solution than using the -copyright option, which doesn’t seem to produce readable results by gThumb and Gnome Image Viewer. The -CopyrightNotice option also works reliably and populates the ITPC CopyrightNotice field. The options -EXIF:Copyright and -copyright produce disappointing results in terms of compatibility with standard image managers on Linux.
Here is how to add standard copyright information to a file:
exiftool -rights="Copyright" -CopyrightNotice="Copyright" "file name.extension"
Batch metadata editing: Replace the file name with a directory name to modify all files in a directory. Use a dot ‘.‘ for the current directory.
A few more tips:
- Remember that extensions and filenames are case sensitive on Linux. Especially when using wildcards, *.jpg is not the same as *.JPG.
- ExifTool creates a copy of the original file, appending
_originalto the file name, as a backup. To avoid that and modify files directly, use the-overwrite_originaloption.
Here is a full example with a standard American copyright notice and no backup file:
exiftool -overwrite_original -rights="©2023 John Doe, all rights reserved" -CopyrightNotice="©2023 John Doe, all rights reserved" "file name.extension"

Add Creator / Author to image metadata
Here we want to add or change creator/author information of the XMP Dublin Core standard schema:
exiftool -XMP-dc:Creator="Creator" "file name.extension"

Copyright Notice an Creator metadata changes in one single command
exiftool -overwrite_original -rights="©2023 John Doe, all rights reserved" -CopyrightNotice="©2023 John Doe, all rights reserved" -XMP-dc:Creator="Creator" "file name.extension"
3. Edit Creative Commons rights information
The Creative Commons official recommendation concerning XMP metadata information is to use identical content for the dc:rights and xmpRights:UsageTerms fields.
exiftool -overwrite_original -XMP-dc:Rights="This work is licensed to the public under the Creative Commons Attribution-ShareAlike license http://creativecommons.org/licenses/by-sa/4.0/" -xmp:usageterms="This work is licensed to the public under the Creative Commons Attribution-ShareAlike license http://creativecommons.org/licenses/by-sa/4.0/" "file name.extension"
Also according to the Creative Commons recommendation, xmpRights:Marked soud be set to False if Public Domain, True otherwise. Here is an example to set the field to True:
exiftool -overwrite_original -xmp:usageterms=True "file name.extension"

Using the Creative Commons schema
Here are some examples for modifying the Creative Commons schema:
License URL
exiftool -overwrite_original -XMP-cc:license="http://creativecommons.org/licenses/by-sa/4.0/" "file name.extension"
Attribution name
exiftool -overwrite_original -XMP-cc:AttributionName="Creator" "file name.extension"
Attribution URL
exiftool -overwrite_original -XMP-cc:AttributionURL="Creator URL" "file name.extension"
Example combining License URL, attribution name and URL
exiftool -overwrite_original -XMP-cc:license="http://creativecommons.org/licenses/by-sa/4.0/" -XMP-cc:AttributionName="Creator" -XMP-cc:AttributionURL="http://creatorURL.com" "file name.extension"

Combining the CC right informations and Creative Commons schema
Here is an example for changing all metadata following the Creative commons recommendations:
exiftool -overwrite_original -XMP-dc:Rights="This work is licensed to the public under the Creative Commons Attribution-ShareAlike license http://creativecommons.org/licenses/by-sa/4.0/" -xmp:usageterms="This work is licensed to the public under the Creative Commons Attribution-ShareAlike license http://creativecommons.org/licenses/by-sa/4.0/" -XMP-cc:license="http://creativecommons.org/licenses/by-sa/4.0/" -XMP-cc:AttributionName="Creator" -XMP-cc:AttributionURL="http://creatorURL.com" "file name.extension"
Final result:

Remove all metadata
Remove all metadata from a file:
exiftool -all= -overwrite_original "file name.extension"
Remove all metadata from the current directory:
exiftool -all= -overwrite_original .
Remove all metadata from all png files in the working directory:
exiftool -all= -overwrite_original -ext png .
By Johannes Eva, May 2016 – March 2023


10 thoughts on “AVIF browser test page: AVIF support in Chrome, Firefox, Edge…”
No option for android
I found this it really helped me and it support batch conversion please add it to the list:
https://play.google.com/store/apps/details?id=ebusky.avif.image.viewer.converter.pdf
Ezgif even does animated AVIFs:
https://ezgif.com/avif-maker
AVIF is now supported in official Firefox 93:
https://www.mozilla.org/en-US/firefox/93.0/releasenotes/
Thank you for your interest – a JPEG XL test page would be useful, but I have no time left at the moment. Hopefully at some time in 2022 🙂
Could you make a similar page for a JPEG XL test?
The following plugin, coupled with the functions.php code mentioned in the post, will allow AVIF images to be uploaded via the Media Library.
https://wordpress.org/plugins/blob-mimes/
Actually, AVIF/JPEG fallback using the element is pure HTML and does not need Javascript, even on this site. And you’re right, I really should switch from GA to Matomo, it’s a matter of time. Cheers!
Sadly your site need javascript enable for the test avif vs jpeg. If noscript bloc everything, this page say that AVIF is not supported and display JPEG fallback.
In JS dependences there is also google-analytics that is not fair play for a libre-software website :(.
Thank you for your article anyway.
Nice article. Love how you included a detailed tutorial for WordPress. I have created a UX optimized converter that support bulk conversion, without the need of uploading files. You can find it on: https://avif.io/
The next update will include a settings panel on which you can edit the quality, effort and exif data.
Feel free to add it to the converter list if you feel like it’s a great addition. Sincerely, Justin
MConverter can convert most image formats to AVIF: https://mconverter.eu/convert/to/avif/
Another nice thing is that it supports batch converting of multiple files at the same time. For the compression it uses a CRF of 10, so the converted images look basically identical.
Comments are closed.