
How to install Geekbench 4, 5 and 6 on Linux
Last updated on January 7, 2026
If you want to install and run Geekbench 4, 5 or Geekbench 6 on Linux, follow this tutorial. The following instructions can be used on:
- a local computer running any Linux distribution
- a remote Linux server (VPS, shared or dedicated hosting…) with access to the command line
I mostly use Geekbench to compare the performance of small VPS instances running Ubuntu Server.
1. Install Geekbench 4, 5 or Geekbench 6 on Linux
You do not need to run Geekbench as root (or use sudo).
1.1 In your home directory, create a temporary directory and enter it:
cd
mkdir geekbench-tmp
cd geekbench-tmp
1.2 Download the Geekbench 4 or 5 or the latest Geekbench 6 and extract the archives:
wget https://cdn.geekbench.com/Geekbench-4.4.4-Linux.tar.gz
tar -zxvf Geekbench-4.4.4-Linux.tar.gz
wget https://cdn.geekbench.com/Geekbench-5.5.1-Linux.tar.gz
tar -zxvf Geekbench-5.5.1-Linux.tar.gz
wget https://cdn.geekbench.com/Geekbench-6.5.0-Linux.tar.gz
tar -zxvf Geekbench-6.5.0-Linux.tar.gz
2. Run Geekbench 4, 5 and Geekbench 6 on Linux
2.1 Enter Geekbench 4 directory and run it:
cd Geekbench-4.4.4-Linux/
./geekbench_x86_64
2.2 Enter Geekbench 5 directory and run it:
cd Geekbench-5.5.1-Linux/
./geekbench_x86_64
2.3 Enter Geekbench 6 directory and run it:
cd Geekbench-6.5.0-Linux/
./geekbench_x86_64
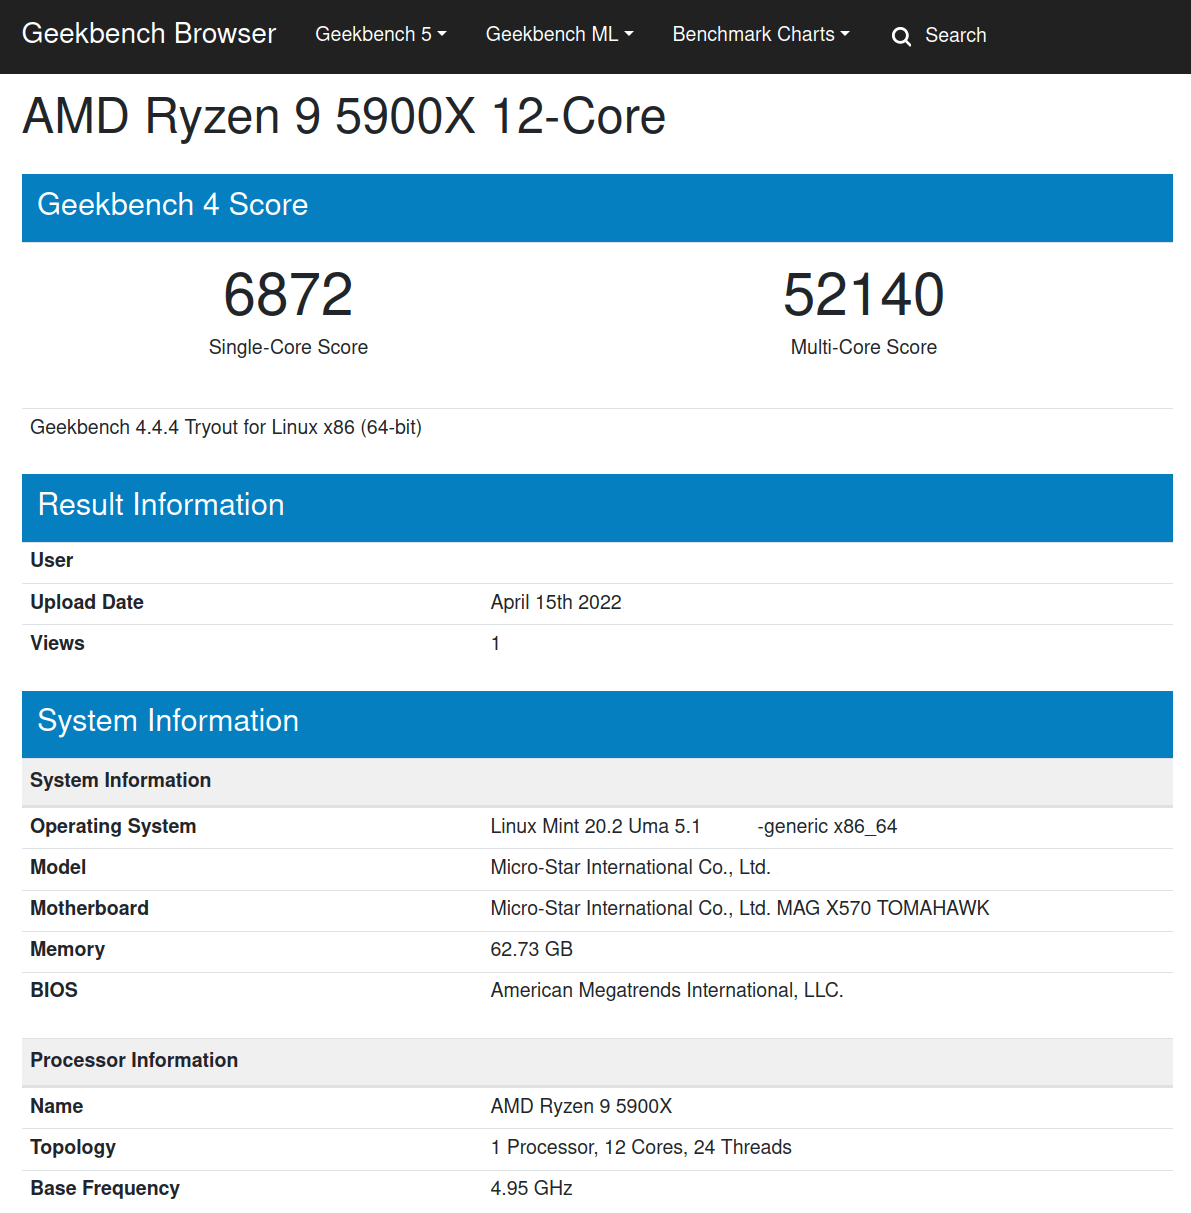
Once Geekbench has finished running, it will display a link to the results, which could look like this:
3. Uninstall Geekbench
To uninstall Geekbench on Linux, simply remove the temporary Geekbench directory:
cdrm -r geekbench-tmp
By Johannes Eva, January 2011 – January 2026


15 thoughts on “How to install LibreOffice on Linux Mint, Ubuntu, MX Linux, Debian…”
You may use the official appimage in Libre Office as well. In fact, on Linux Mint 21 you can’t get rid of the default LO as it may lead to dependency issues. Appimage helps.
Pingback: Ubuntu 21.04: Essentials – Linux Sagas
Right! The correct command for removing completely the stock LibreOffice on Linux is the following:
sudo apt purge libreoffice-commonThe following command also works but misses some packages:
sudo apt purge libreoffice*Thank you for your comment, I updated the article accordingly.
Issuing
$ sudo apt-get remove libreoffice-coreinstalls an office core no gui. With or without purging. Yielding this:The following packages will be REMOVED:libreoffice-base libreoffice-calc libreoffice-core libreoffice-draw libreoffice-gnome libreoffice-gtk3 libreoffice-impress libreoffice-lightproof-ru-ru libreoffice-math libreoffice-nlpsolver libreoffice-report-builder libreoffice-report-builder-bin libreoffice-script-provider-python libreoffice-sdbc-postgresql libreoffice-wiki-publisher python3-uno
The following NEW packages will be installed:
libreoffice-core-nogui
Many thanks for any clarification!
NOTE:- I found that Libre Office version 6.3.2.2 is extremely buggy, it has major dependency problems attempting to install on Linux Mint (Tina 19.2). I wasn’t able to resolve these problems so had to revert the install (remove 6.3.2.2-2) and return to previous version 6.3.1 which works fine.
**Windows 10 (1903) ALSO NOTE that LO 6.3.2.2 installs on W10 but also caused major performance issues and hung my system on reboot. My machine Borked badly so once again had to revert back to LO 6.3.1 which works fine.
Thanks for the Terminal codes. Newbies like me just want it to work and your codes provide the copy and paste necessities for Linux to do its magic.
(If it can’t be done in Linux (and LibreOffice) its not worth doing)
The last line says it all: check if you are running another instance of dpkg. In last resort, try to remove dpkg lock file:
sudo rm /var/lib/dpkg/lockThen let dpkg fix itself:
sudo dpkg --configure -aNote that this problem is not per se related to LibreOffice.
please help me with this error, newbee here
root@Anon:~/libreoffice# sudo dpkg -i *.debdpkg: error: dpkg status database is locked by another process
root@Anon:~/libreoffice# cd LibreOffice_6.0.2.1_Linux_x86_deb
root@Anon:~/libreoffice/LibreOffice_6.0.2.1_Linux_x86_deb# sudo dpkg -i *.deb
dpkg: error: dpkg status database is locked by another process
root@Anon:~/libreoffice/LibreOffice_6.0.2.1_Linux_x86_deb# cd debs
bash: cd: debs: No such file or directory
root@Anon:~/libreoffice/LibreOffice_6.0.2.1_Linux_x86_deb# cd DEBS
root@Anon:~/libreoffice/LibreOffice_6.0.2.1_Linux_x86_deb/DEBS# sudo dpkg -i *.deb
dpkg: error: dpkg status database is locked by another process
root@Anon:~/libreoffice/LibreOffice_6.0.2.1_Linux_x86_deb/DEBS# sudo dpkg -i *.deb
dpkg: error: dpkg status database is locked by another process
Thank you Stefano, that was the info I was looking for. This method works even for LibreOffice 6.
Please mind that the mentioned PPA is only available on LTS and the latest non-LTS release.
In Ubuntu, you could use this repository and LibreOffice will always be upgraded to the latest version:
sudo add-apt-repository ppa:libreoffice/ppa
Details here:
http://tipsonubuntu.com/2017/01/31/install-libreoffice-5-3-ubuntu/
Would be useful to know how to install such alongside the native repository install of LibreOffice – without conflict. Would be useful to be able to choose, say, LibreOffice Writer 5.2, vs just LibreOffice Writer. Migrations / new versions not always working as seamlessly as one might like with files one might already have. It can be very frustrating to have a new version munge (e.g. formatting) of a current document one depends on, and not being able to ‘un-munge’ it.
Thanks Ogalho. Alacarte is a great tool, though it has not been updated for a while. An alternative is MenuLibre, which is also not very often updated. Anyway, here is a tutorial for Alacarte:
https://www.howtoforge.com/tutorial/how-to-manage-main-menu-icons-in-gnome/
Alacarte for Linux Mate Edition is named Mozo.
All of them should be good enough to create menu shortcuts for LibreOffice!
Install alacarte to manage the menu itens.
Works well. The only problem I had is that the icons were not created. I created them manually by running Writer, Calc and Impress and the using the “Lock to Launcher” option. This is how to run them from the terminal:
Writer: /opt/libreoffice5.0/program/oosplash –writer
Calc: /opt/libreoffice5.0/program/oosplash –calc
Impress: /opt/libreoffice5.0/program/oosplash –impress
Comments are closed.