
Photo: libre-software.net. License: CC BY-SA 4.0
How to remove TLSv1.0 / 1.1 and enable TLS 1.3 in Nginx …
… on Ubuntu 20.04, 22.04 or 24.04
Last updated on January 29, 2026
In this tutorial, we will:
These changes should not affect servers using Let’s Encrypt / Certbot. Please BACKUP your server / websites now!
1. Disable TLS v1.0 and TLS v1.1, enable TLS v1.3
Should I really disable TLS v1.0 and TLS v1.1?
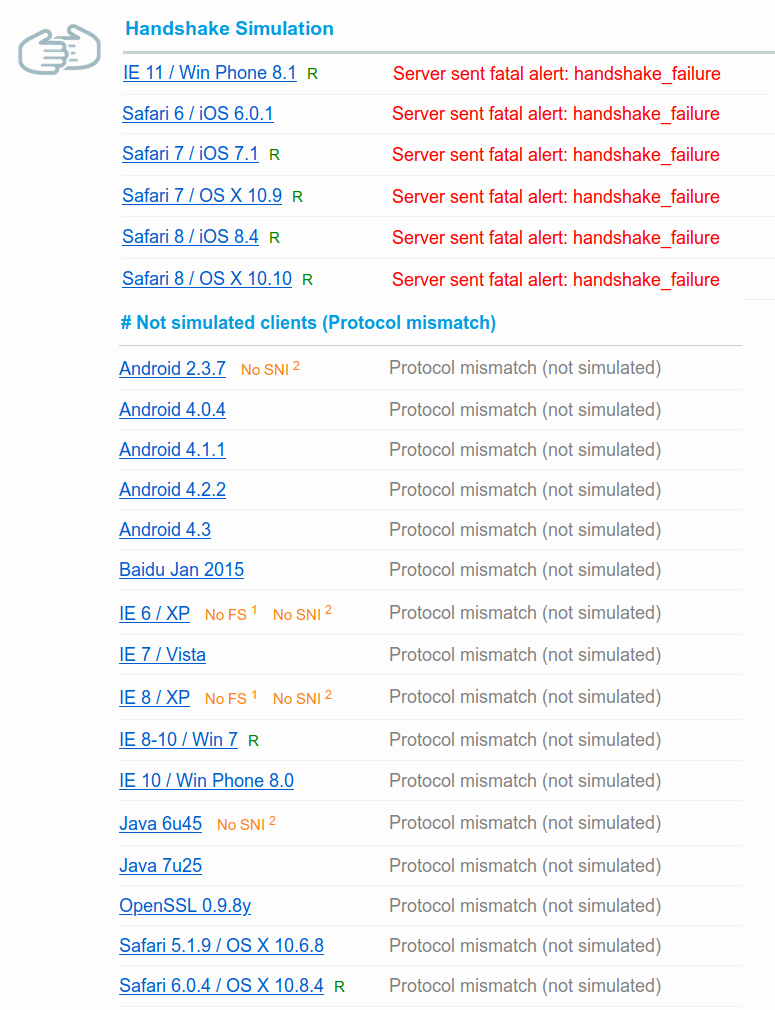
Disabling TLS 1.1 and 1.1 and improving cipher strength will cause problems for a small percentage of your audience: those using deprecated browsers / OS versions. On this example I disabled TLSv1 & v1.1 and removed weak ciphers on a server, resulting in several audience “losses”:
As of January 12, 2026, some of the biggest Websites (Google, Facebook) still support TLSv1.0 and TLSv1.1 as well as weaker cipher suites – maybe they have good reasons to do so. Twitter and Wikipedia have removed TLS 1.0 and 1.1 support.
If I disable TLS v1.0 and TLS v1.1, should I enable TLS v1.3?
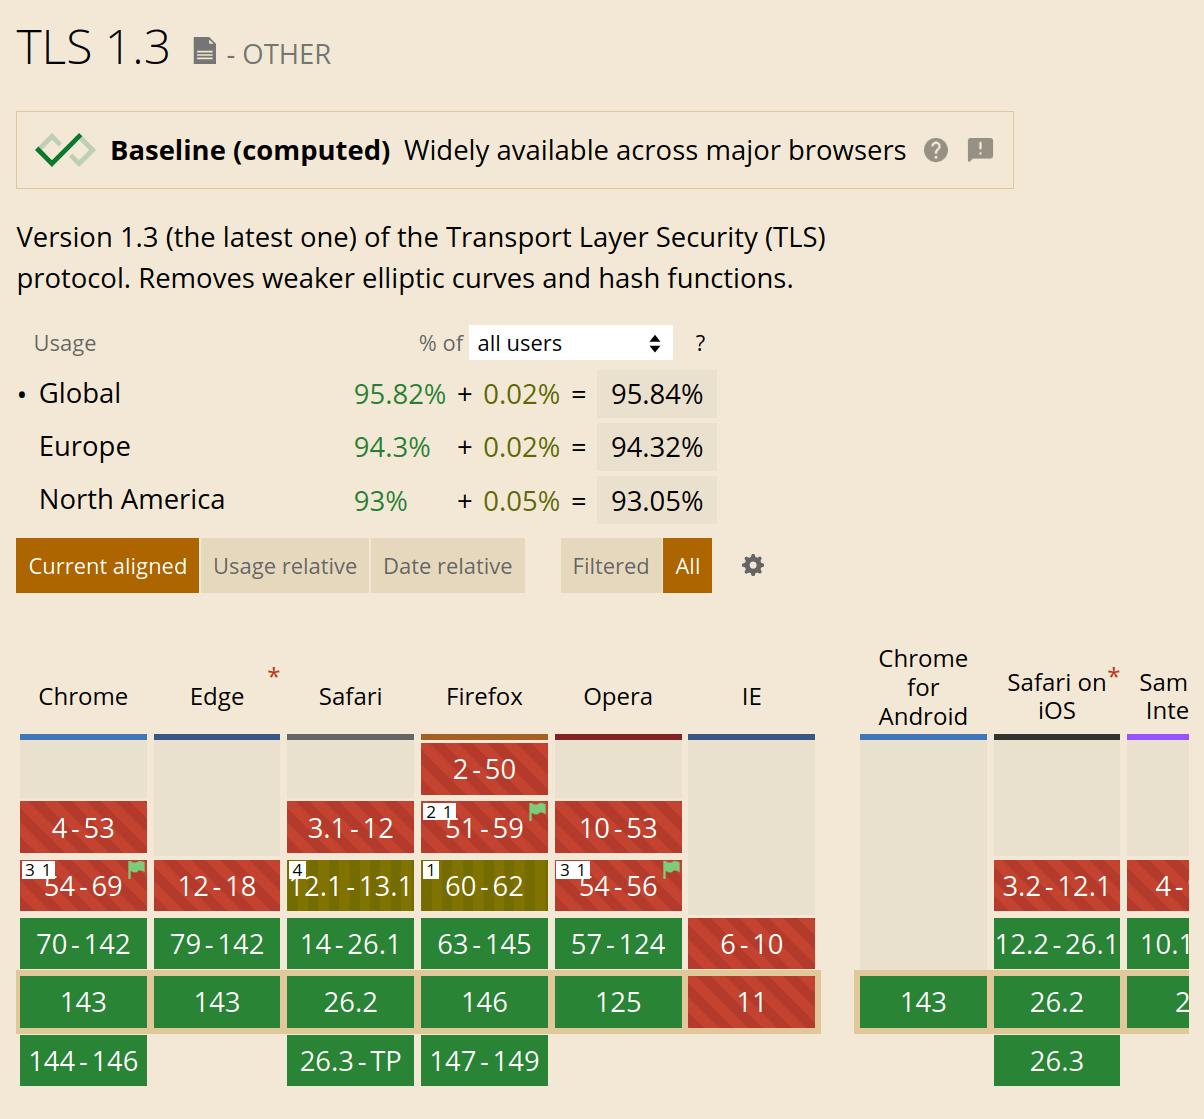
Yes, you should definitely enable TLS v1.3 – even if you keep TLS 1.0 / 1.1. TLS 1.3 is faster than version 1.2, and it is already supported by most mainstream browsers (screenshot taken on January 10, 2026):
Use the following link to check the current browser support of TLS 1.3 on “Can I use”: Can I use TLS 1.3?
Disable TLS 1.0 / 1.1 and enable TLS 1.3
We are going to edit at least two different configuration files:
/etc/nginx/nginx.conf/etc/nginx/sites-available/example.com(or/default)
If you use Certbot / Let’s Encrypt, we may also edit this third configuration file:
/etc/letsencrypt/options-ssl-nginx.conf
Step 1: edit nginx.conf
First, backup the nginx.conf configuration file:sudo cp /etc/nginx/nginx.conf /etc/nginx/nginx.backup-tls
Then edit this configuration file, for example with Nano:sudo nano /etc/nginx/nginx.conf
Look for the following line within a http { } block. This line may (or may not) be commented after a hash as follows:ssl_protocols TLSv1 TLSv1.1 TLSv1.2 TLSv1.3; # Dropping SSLv3, ref: POODLE
Simply remove TLSv1 TLSv1.1 from the line. Add TLSv1.3 if needed, the line now should look like this:ssl_protocols TLSv1.2 TLSv1.3;
Save the file by typing Ctrl + O, then ⏎ Enter and finally Ctrl + X to exit.
Check if the Nginx configuration is valid:nginx -t
Reload Nginx:sudo service nginx reload
As a last step, check if TLS 1.0 and 1.1 are effectively disabled on your host, for example using the SSL Labs server testing service. Step 1 may already be sufficient in some configurations.
What if TLS 1.0 and 1.1 are still NOT disabled?
Go on with step 2.
Step 2: edit the server block configuration file
Old SSL protocols may still be active in the server block configuration. Find your server configuration file:cd /etc/nginx/sites-available/ls -l
Edit the server block configuration, for example:sudo nano /etc/nginx/sites-available/default
ORsudo nano /etc/nginx/sites-available/example.com
Again, look for the following line:ssl_protocols TLSv1 TLSv1.1 TLSv1.2;
Remove the protocols marked in red, add TLSv1.3 to get the following line:ssl_protocols TLSv1.2 TLSv1.3;
Save the file and exit nano ( Ctrl + O , ⏎ Enter , Ctrl + X ), test the configuration, reload Nginx, and test your Website.nginx -tsudo service nginx reload
What if you can’t find the ssl_protocols line in this file?
Go on with step 3.
Step 3: edit options-ssl-nginx.conf
If you use Certbot to generate or renew Let’s Encrypt certificates, you probably won’t find the ssl_protocols line, but the following “include” command:include /etc/letsencrypt/options-ssl-nginx.conf; # managed by Certbot
Exit nano without saving ( Ctrl + X ) and edit the Let’s Encrypt shared SSL settings:sudo nano /etc/letsencrypt/options-ssl-nginx.conf
This configuration file is short:
# This file contains important security parameters. If you modify this file
# manually, Certbot will be unable to automatically provide future security
# updates. Instead, Certbot will print and log an error message with a path to
# the up-to-date file that you will need to refer to when manually updating
# this file.

ssl_session_cache shared:le_nginx_SSL:1m;
ssl_session_timeout 1440m;

ssl_protocols TLSv1 TLSv1.1 TLSv1.2;
ssl_prefer_server_ciphers on;

ssl_ciphers "ECDHE-ECDSA-CHACHA20-POLY1305:ECDHE-RSA-CHACHA20-POLY1305:ECDHE-ECDSA-AES128-GCM-SHA256:ECDHE-RSA-AES128-GCM-SHA256:ECDHE-ECDSA-AES256-GCM-SHA384:ECDHE-RSA-AES256-GCM-SHA384:DHE-RSA-AES128-GCM-SHA256:DHE-RSA-AES256-GCM-SHA384:ECDHE-ECDSA-AES128-SHA256:ECDHE-RSA-AES128-SHA256:ECDHE-ECDSA-AES128-SHA:ECDHE-RSA-AES256-SHA384:ECDHE-RSA-AES128-SHA:ECDHE-ECDSA-AES256-SHA384:ECDHE-ECDSA-AES256-SHA:ECDHE-RSA-AES256-SHA:DHE-RSA-AES128-SHA256:DHE-RSA-AES128-SHA:DHE-RSA-AES256-SHA256:DHE-RSA-AES256-SHA:ECDHE-ECDSA-DES-CBC3-SHA:ECDHE-RSA-DES-CBC3-SHA:EDH-RSA-DES-CBC3-SHA:AES128-GCM-SHA256:AES256-GCM-SHA384:AES128-SHA256:AES256-SHA256:AES128-SHA:AES256-SHA:DES-CBC3-SHA:!DSS";
Again, remove TLSv1 and TLSv1.1 in the following line and add TLSv1.3:ssl_protocols TLSv1 TLSv1.1 TLSv1.2;
The line should look like this:ssl_protocols TLSv1.2 TLSv1.3;
Test the configuration, reload Nginx and test your Website.nginx -t
sudo service nginx reload
Did these changes affect Certbot / Let’s Encrypt certifications renewals?
Check if renewal works using:sudo certbot renew --dry-run
However, this check may be insufficient in our case. Please BACKUP your website before forcing a cert renewal:certbot renew --force-renewal
In my experience, there were no problems with Certbot after making TLS version changes.
2. Enable HTTP/2 in Nginx
This part is really easy. First check your Nginx version:nginx -v
To run HTTP/2, you must use Nginx version 1.9.5 or later – which should be no problem on Ubuntu 18.04 and later releases. You websites should also use SSL/TLS encryption.
Edit the server block configuration, for example:sudo nano /etc/nginx/sites-available/defaultOR
sudo nano /etc/nginx/sites-available/example.com
Look for the following lines within the server { } block:
# SSL configurationlisten 443 ssl default_server;listen [::]:443 ssl default_server;
If you use Certbot, these lines will probably be at the end of the file and look like this:
listen [::]:443 ssl ipv6only=on; # managed by Certbot
listen 443 ssl; # managed by Certbot
Older Nginx versions (before 1.25.0)
Simply add http2 after 443 ssl on both lines. In the second example (Certbot), it should now like like this:
listen [::]:443 ssl http2 ipv6only=on; # managed by Certbot
listen 443 ssl http2; # managed by Certbot
Newer Nginx versions (≥ 1.25.1)
Simply add http2 on as a new line:
listen [::]:443 ssl ipv6only=on; # managed by Certbot
listen 443 ssl; # managed by Certbot
http2 on;
Save the file and exit nano ( Ctrl + O , ⏎ Enter , Ctrl + X ), test the Nginx configuration and reload Nginx:nginx -tsudo service nginx reload
Test if HTTP/2 is active
To test if HTTP/2 has been successfully enabled, you for example use KeyCDN’s (free) online tool:
KeyCDN HTTP/2 Test Tool
By the way, HTTP/3 is coming: experimental support is available in Nginx 1.25 and has already made its way to all major browsers (except Safari), see Can I use HTTP/3.
3. Improve Nginx security
This part of the tutorial assumes you use Let’s Encrypt with Certbot.
3.1. Edit the Let's Encrypt shared SSL settings (options-ssl-nginx.conf)
Open the Let’s Encrypt shared SSL settings file:
sudo nano /etc/letsencrypt/options-ssl-nginx.conf
Improve SSL session cache, disable SSL session tickets
SSL shared session cache is already active in the default Certbot configuration. Modify the SSL session cache to increase cache and reduce timeout:
ssl_session_cache shared:le_nginx_SSL:40m; # holds approx 40 x 4000 sessionsssl_session_timeout 6h;ssl_session_tickets off;
Use a stronger cipher suite
Replace the default cipher suite in the Let’s Encrypt shared SSL settings. Even the “Old” cipher suite in Mozilla’s SSL Configuration Generator is stronger than Let’s Encrypt default cipher list. Mozilla’s “Intermediate” list for TLS v1.2 could be a good choice:ssl_ciphers ECDHE-ECDSA-AES128-GCM-SHA256:ECDHE-RSA-AES128-GCM-SHA256:ECDHE-ECDSA-AES256-GCM-SHA384:ECDHE-RSA-AES256-GCM-SHA384:ECDHE-ECDSA-CHACHA20-POLY1305:ECDHE-RSA-CHACHA20-POLY1305:DHE-RSA-AES128-GCM-SHA256:DHE-RSA-AES256-GCM-SHA384;
3.2. Edit the server block configuration
Edit the server block configuration, for example:sudo nano /etc/nginx/sites-available/defaultOR
sudo nano /etc/nginx/sites-available/example.com
(Give up) OCSP stapling
Update! Let’s encrypt has dropped support for OCSP:
Let’s encrypt: Ending OCSP Support in 2025
Mozilla’s Web Security Cheat Sheet doesn’t even mention OCSP stapling anymore:
Web Security Cheat Sheet
Websites like Twitter, Facebook and Google don’t use OCSP stapling (but Wikipedia does).
If you got the following errors when testing nginx:[warn] 113293#113293: "ssl_stapling" ignored, no OCSP responder URL in the certificate "/etc/letsencrypt/live/example.com/fullchain.pem"
Remove the following lines from your server block:# OCSP staplingssl_stapling on;ssl_stapling_verify on;
HTTP Strict Transport Security (HSTS)
Inside the server {} block, add the following lines:
# HSTS (63072000 seconds = 2 years)add_header Strict-Transport-Security "max-age=63072000; includeSubdomains;" always;
or for one year:
# HSTS (31536000 seconds = 1 year)add_header Strict-Transport-Security "max-age=31536000; includeSubdomains;" always;
Be careful with HSTS preloading!
“Be aware that once you set the STS header or submit your domains to the HSTS preload list, it is impossible to remove it. It’s a one‑way decision to make your domains available over HTTPS.” Read more at:
Activating HSTS preloading should be considered thoroughly. In this guide we chose not to use HSTS preloading.
Security headers
Add the following lines to the server {} block of each domain, or to http {} block in /etc/nginx/nginx.conf to make it work for all domains:
# Prevent clickjacking (legacy + modern)
add_header X-Frame-Options SAMEORIGIN always;
add_header Content-Security-Policy "frame-ancestors 'self'" always;
# Prevent MIME sniffing
add_header X-Content-Type-Options nosniff always;
# Control referrer leakage
add_header Referrer-Policy strict-origin-when-cross-origin always;
Test and reload Nginx:nginx -tsudo service nginx reload
That’s it! Now it’s time to check your SSL Labs rating!
Useful SSL resources:
- Mozilla’s SSL Configuration Generator: a fantastic tool to generate Nginx (and Apache) SSL configurations. Follow this link for an example with Nginx Stable 1.24, OpenSSL 1.1.1 and only TLSv1.2 and TLSv1.3.
- Mozilla’s Web Security Cheat Sheet
By Johannes Eva, November 2019 – January 2026


15 thoughts on “How to install LibreOffice on Linux Mint, Ubuntu, MX Linux, Debian…”
You may use the official appimage in Libre Office as well. In fact, on Linux Mint 21 you can’t get rid of the default LO as it may lead to dependency issues. Appimage helps.
Pingback: Ubuntu 21.04: Essentials – Linux Sagas
Right! The correct command for removing completely the stock LibreOffice on Linux is the following:
sudo apt purge libreoffice-commonThe following command also works but misses some packages:
sudo apt purge libreoffice*Thank you for your comment, I updated the article accordingly.
Issuing
$ sudo apt-get remove libreoffice-coreinstalls an office core no gui. With or without purging. Yielding this:The following packages will be REMOVED:libreoffice-base libreoffice-calc libreoffice-core libreoffice-draw libreoffice-gnome libreoffice-gtk3 libreoffice-impress libreoffice-lightproof-ru-ru libreoffice-math libreoffice-nlpsolver libreoffice-report-builder libreoffice-report-builder-bin libreoffice-script-provider-python libreoffice-sdbc-postgresql libreoffice-wiki-publisher python3-uno
The following NEW packages will be installed:
libreoffice-core-nogui
Many thanks for any clarification!
NOTE:- I found that Libre Office version 6.3.2.2 is extremely buggy, it has major dependency problems attempting to install on Linux Mint (Tina 19.2). I wasn’t able to resolve these problems so had to revert the install (remove 6.3.2.2-2) and return to previous version 6.3.1 which works fine.
**Windows 10 (1903) ALSO NOTE that LO 6.3.2.2 installs on W10 but also caused major performance issues and hung my system on reboot. My machine Borked badly so once again had to revert back to LO 6.3.1 which works fine.
Thanks for the Terminal codes. Newbies like me just want it to work and your codes provide the copy and paste necessities for Linux to do its magic.
(If it can’t be done in Linux (and LibreOffice) its not worth doing)
The last line says it all: check if you are running another instance of dpkg. In last resort, try to remove dpkg lock file:
sudo rm /var/lib/dpkg/lockThen let dpkg fix itself:
sudo dpkg --configure -aNote that this problem is not per se related to LibreOffice.
please help me with this error, newbee here
root@Anon:~/libreoffice# sudo dpkg -i *.debdpkg: error: dpkg status database is locked by another process
root@Anon:~/libreoffice# cd LibreOffice_6.0.2.1_Linux_x86_deb
root@Anon:~/libreoffice/LibreOffice_6.0.2.1_Linux_x86_deb# sudo dpkg -i *.deb
dpkg: error: dpkg status database is locked by another process
root@Anon:~/libreoffice/LibreOffice_6.0.2.1_Linux_x86_deb# cd debs
bash: cd: debs: No such file or directory
root@Anon:~/libreoffice/LibreOffice_6.0.2.1_Linux_x86_deb# cd DEBS
root@Anon:~/libreoffice/LibreOffice_6.0.2.1_Linux_x86_deb/DEBS# sudo dpkg -i *.deb
dpkg: error: dpkg status database is locked by another process
root@Anon:~/libreoffice/LibreOffice_6.0.2.1_Linux_x86_deb/DEBS# sudo dpkg -i *.deb
dpkg: error: dpkg status database is locked by another process
Thank you Stefano, that was the info I was looking for. This method works even for LibreOffice 6.
Please mind that the mentioned PPA is only available on LTS and the latest non-LTS release.
In Ubuntu, you could use this repository and LibreOffice will always be upgraded to the latest version:
sudo add-apt-repository ppa:libreoffice/ppa
Details here:
http://tipsonubuntu.com/2017/01/31/install-libreoffice-5-3-ubuntu/
Would be useful to know how to install such alongside the native repository install of LibreOffice – without conflict. Would be useful to be able to choose, say, LibreOffice Writer 5.2, vs just LibreOffice Writer. Migrations / new versions not always working as seamlessly as one might like with files one might already have. It can be very frustrating to have a new version munge (e.g. formatting) of a current document one depends on, and not being able to ‘un-munge’ it.
Thanks Ogalho. Alacarte is a great tool, though it has not been updated for a while. An alternative is MenuLibre, which is also not very often updated. Anyway, here is a tutorial for Alacarte:
https://www.howtoforge.com/tutorial/how-to-manage-main-menu-icons-in-gnome/
Alacarte for Linux Mate Edition is named Mozo.
All of them should be good enough to create menu shortcuts for LibreOffice!
Install alacarte to manage the menu itens.
Works well. The only problem I had is that the icons were not created. I created them manually by running Writer, Calc and Impress and the using the “Lock to Launcher” option. This is how to run them from the terminal:
Writer: /opt/libreoffice5.0/program/oosplash –writer
Calc: /opt/libreoffice5.0/program/oosplash –calc
Impress: /opt/libreoffice5.0/program/oosplash –impress
Comments are closed.